|
|
||
|---|---|---|
| .devops | ||
| .idea | ||
| client | ||
| common | ||
| coordinator | ||
| deploy | ||
| docs | ||
| hub | ||
| jcsctl | ||
| magefiles | ||
| .gitignore | ||
| Dockerfile | ||
| README.md | ||
| README_en.md | ||
| go.mod | ||
| go.sum | ||
README_en.md
JCS-pub (JointCloud Storage Public Infrastructure) + JCS-client (Ready-to-Use JointCloud Storage Client)
Project Overview
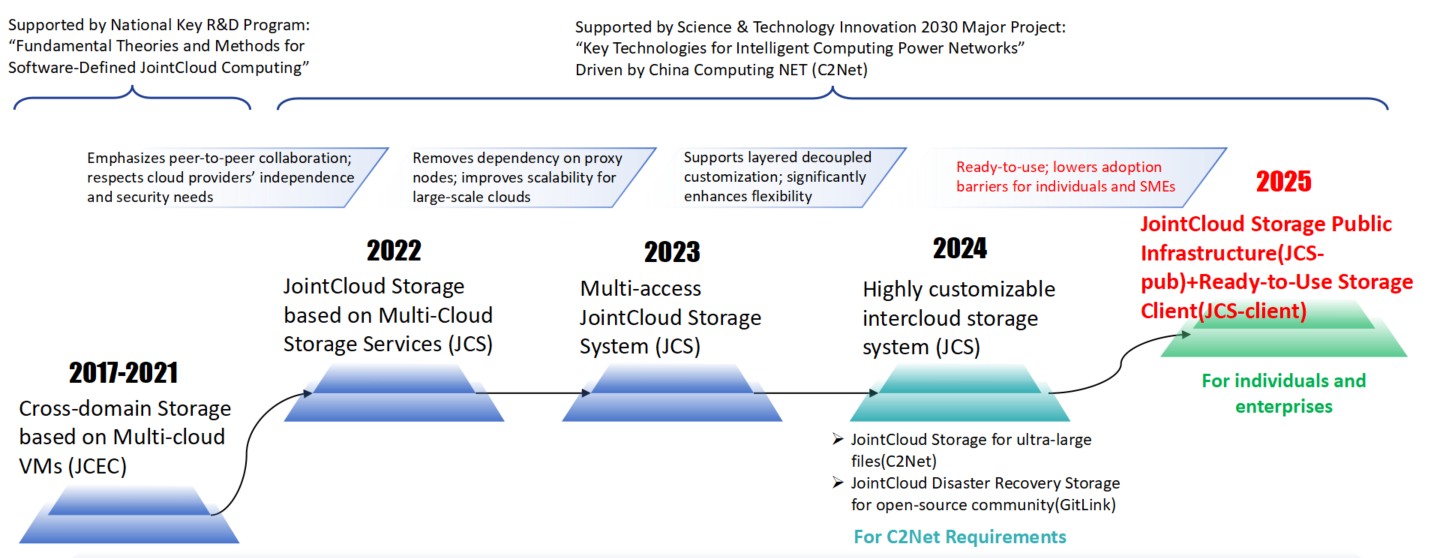
JointCloud Storage is a storage service model built on a peer-to-peer JointCloud collaboration mechanism. It manages storage resources across multiple clouds and provides users with a unified data storage service. The core idea emphasizes the independent and equal status of each cloud, connecting them in a non-intrusive manner. It also promotes intercloud collaboration by integrating computing, storage, and networking resources across clouds to deliver high-quality storage services.
This project aims to turn JointCloud Storage into a public infrastructure that is easy to use for individuals and enterprises alike. By simply using a JCS-client, users can quickly access efficient jointcloud storage without the need to deploy additional components. At the same time, the system allows flexible customization of its features to meet diverse needs.
Evolution Roadmap
Features
1. Data Migration
- Cross-Cloud Migration Support: Allows users to migrate data across multiple cloud storage providers.
- Policy-Driven Migration Engine
- Filtering Rules: Migrate files based on size, file extension, or directory path.
- Scheduling Control: Define migration time windows.
- Post-Migration Actions: Allow users to choose whether to retain or delete the original data after migration.
- Migration Efficiency Optimization: Improve migration performance and reduce bandwidth costs by leveraging the JCS-pub.
2. Cross-Cloud Data Storage
- Unified Multi-Cloud View: Store data across multiple cloud platforms while presenting a unified view to users, abstracting away multi-cloud complexity.
- Multi-Level Disaster Recovery: Provides cloud-level resilience through various redundancy strategies, including erasure coding, replication, and hybrid redundancy (erasure coding + replication).
- Adaptive Redundancy Strategy
- Redundancy Scheme: Customize the number of replicas, EC data blocks, and coding algorithms.
- Data Placement: Configure where each replica or EC block is stored.
- Cross-Cloud Command Set: Supports custom commands such as upload, download, random read, cross-cloud scheduling, and cross-cloud repair.
- Multiple Data Access Methods
- REST API
- Command-line interface
- FUSE file system
- Access Efficiency Optimization: Boost cross-cloud data access speed and reduce traffic costs via the JCS-pub.
3. Hybrid Local + Multi-Cloud Storage
- Unified Hybrid Storage View: Store data across both local file systems and multiple remote cloud platforms, while presenting a unified view and hiding underlying complexities.
- Intelligent Data Collaboration Strategy: Offers flexible policies for syncing data between local and remote storage.
- Data Filtering: Dynamically select files for remote sync based on size, path, or extension.
- Local Retention: Configure whether to keep local copies of remote data.
- Bidirectional Sync: Independently configure local-to-cloud and cloud-to-local synchronization.
- Collaboration Efficiency Optimization: Enhance sync performance and reduce traffic costs using the JCS-pub.
- Multiple Data Access Methods
- REST API
- Command-line interface
- FUSE file system
4. Ready-to-Use Deployment
- Simply download and install the client — no additional components or configuration needed.
5. JCS-pub
- Unified Hybrid Storage View: Supports unified access across local file systems and multiple remote cloud platforms, abstracting the complexity behind a consistent interface.
- Dual Operation Modes:
- Standalone Mode: Fully offline usage without any external service dependencies.
- Infrastructure-Connected Mode: Operates with public infrastructure support(enhances performance and reduces bandwidth cost).
- Open Source Public Infrastructure:
- Users can self-deploy or connect to existing public infrastructure.
- Free Public Infrastructure Access:
- To obtain an account, password, and certificate, please send an Email to
song-jc@foxmail.com. The application process is illustrated below.
- To obtain an account, password, and certificate, please send an Email to

Architecture Diagram
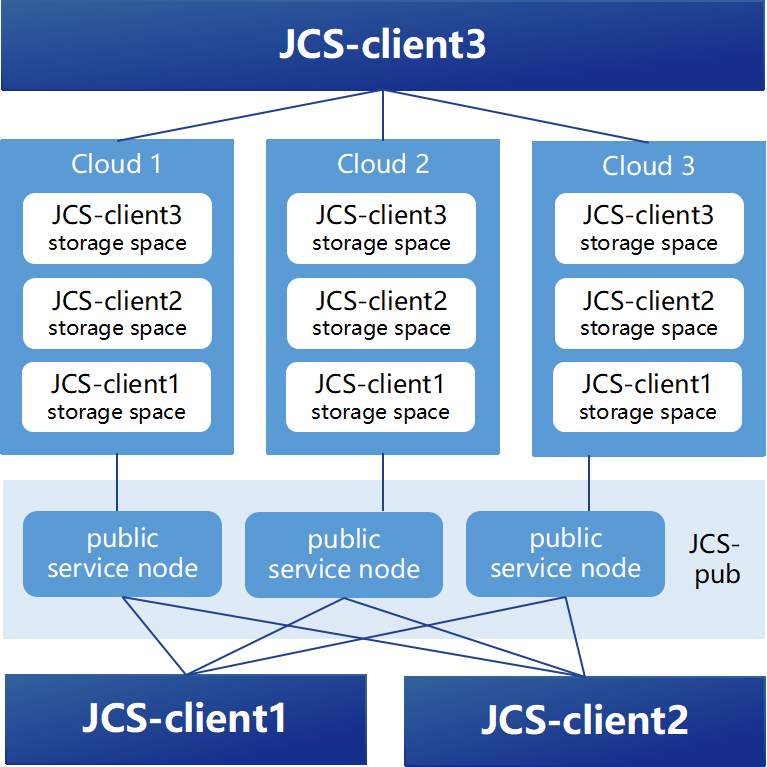
1. Cloud Storage Space
- Before using the JointCloud Storage client, users must prepare their own cloud storage space. This typically refers to object storage buckets or directories in file storage services. Both public cloud storage services and private cloud deployments are supported.
- For tutorials on registering mainstream public cloud storage services, see: Guide
2. JCS-pub
- The public infrastructure consists of multiple proxy nodes. These nodes collaborate with clients to perform cross-cloud operations such as data migration, upload, and download. They also optimize data transfer routes and support concurrent access, improving performance and reducing bandwidth costs. This design prevents the client from becoming a performance bottleneck.
3. JCS-client
- The JointCloud Storage Client is deployed on the user's server and serves as both a data service gateway and metadata management node.
- Users manage their cloud storage data through various interfaces provided by the client.
- All metadata and cloud storage credentials remain on the client managed by the user. When a proxy node needs to access a user’s cloud storage, the client temporarily grants access permissions as needed.
Installation
1. Third-Party Dependencies
The following components must be installed manually:
MySQL: Version 8.0 or above. Please create a database and user account for the JCS client to use.
2. Docker Installation (Recommended)
Currently, only the JCS client is available as a Docker image. The jcsctl tool must be used as a precompiled executable — Download here.
Pull the Docker image
docker pull jcs:latest
If you already have your configuration and certificate files prepared, simply mount the directory containing these files into the container using the -v flag, and use the -c flag to specify the path to the configuration file (inside the container).
If you haven’t prepared the configuration yet and want to generate it using the client’s init command, you should still mount a local directory using -v so that the generated configuration and certificate files can be saved to it.
Here is an example command:
# Assuming the config files are on the host at /etc/jcsconfs
docker run -v /etc/jcsconfs:/opt/confs \
jcs serve -c /opt/confs/config.json # Note: the config path is inside the container
3. Build from Source
Before compiling, make sure you have the following installed:
Go: Version 1.23 or abovemage: A Makefile-like build tool. GitHub repository: Mage
After installing dependencies, clone this repository and run the following command in the project root:
mage bin
After successful execution, a build directory will be created in the project root containing the compiled executables:
jcs: The main JCS clientjcsctl: Command-line tool for the client (add it to your PATH for convenience)coordinator: Coordination node for the JCS system (can be ignored if using the public JCS infrastructure)hub: Central node of the JCS system (can also be ignored if using the public infrastructure)
4. Install Precompiled Executables
Download and extract the binaries that match your system environment — Download here.
Usage Guide
1. Generate Configuration File
Use the init command of the JCS client to start the configuration process and follow the prompts to fill in the required information.
Note: If you plan to run the JCS client using the Docker image, all paths in the configuration should refer to locations inside the container.
After completing the command, the following files will be generated:
config.json: The full configuration file for the client.ca_cert.pem: Root certificate for the HTTP service.ca_key.pem: Root private key for the HTTP service(must be securely stored by the user).server_cert.pem,server_key.pem: Server certificate and key signed by the root key.client_cert.pem,client_key.pem: Client certificate and key signed by the root key, used by jcsctl or third-party programs.
All files except ca_key.pem will be used during client operation.
The configuration file fields are explained as follows:
{
    "hubRPC": {
        "rootCA": "" // Path to root certificate for communication with the Hub service
    },
    "coordinatorRPC": {
        "address": "127.0.0.1:5009", // Address of the Coordinator service
        "rootCA": "" // Path to root certificate for communication with the Coordinator service, usually same as Hub's rootCA
    },
    "logger": {
        "output": "stdout", // Log output mode: stdout or file
        "outputFileName": "client", // Log file name (effective if output is file)
        "outputDirectory": "log", // Directory for log files (effective if output is file)
        "level": "debug" // Log level: debug, info, warn, error
    },
    "db": {
        "address": "127.0.0.1:3306", // MySQL database address
        "account": "root", // Database username
        "password": "123456", // Database password
        "databaseName": "cloudream" // Database name
    },
    "connectivity": {
        "testInterval": 300 // Interval in seconds to test connectivity with the Hub
    },
    "downloader": {
        "maxStripCacheCount": 100, // Maximum number of EC stripes cached during file reads
        "ecStripPrefetchCount": 1 // Number of EC stripes to prefetch during read operations
    },
    "downloadStrategy": {
        "highLatencyHub": 35 // Latency threshold in ms; Hubs above this latency are considered high latency
    },
    "tickTock": {
        "ecFileSizeThreshold": 5242880, // Minimum file size in bytes to apply EC encoding
        "accessStatHistoryWeight": 0.8 // Weight of previous day's access count when updating today's access statistics (range 0~1)
    },
    "http": {
        "enabled": true, // Enable HTTP service
        "listen": "127.0.0.1:7890", // HTTP service listen address
        "rootCA": "", // Path to root certificate
        "serverCert": "", // Path to server certificate
        "serverKey": "", // Path to server private key
        "clientCerts": [], // List of client certificates signed by the root CA
        "maxBodySize": 5242880 // Maximum HTTP request body size in bytes
    },
    "mount": {
        "enabled": false, // Enable FUSE mount
        "mountPoint": "", // Mount directory path
        "gid": 0, // GID for files and folders in the mount directory
        "uid": 0, // UID for files and folders in the mount directory
        "dataDir": "", // Cache data directory
        "metaDir": "", // Metadata directory
        "maxCacheSize": 0, // Max cache size in bytes (0 means unlimited; not enforced in real-time)
        "attrTimeout": "10s", // OS cache timeout for file attributes
        "uploadPendingTime": "30s", // Delay after file modification before upload starts
        "cacheActiveTime": "1m", // Time cached data remains active in memory before cleanup
        "cacheExpireTime": "1m", // Time cached files remain on disk after being removed from memory (effective only for fully uploaded files)
        "scanDataDirInterval": "10m" // Interval to scan the cache directory
    },
    "accessToken": {
        "account": "", // Account for logging into the public JCS system
        "password": "" // Password for the public JCS system
    }
}
Note: If manually editing this JSON file, remove all comments as JSON does not support comments.
2. Command Line
jcsctl is the command-line tool for managing the JCS client. It requires certificates for authentication, generated during client initialization. The required files are ca_cert.pem, client_cert.pem, and client_key.pem.
When starting, jcsctl searches for these files in the following order:
- Paths specified via command-line options
--ca,--cert, and--key. - The directory where the
jcsctlexecutable resides.
By default, jcsctl attempts to connect to the client at https://127.0.0.1:7890. Use the --endpoint option to specify a different client address.
3. API
See the API documentation: Access here
Testing & Evaluation
Test framework under development. Stay tuned for updates or join us in contributing!
Custom Redundancy Strategy
Redundancy strategies significantly impact the read/write process and are closely integrated with various parts of the codebase. When implementing your own strategy, it's highly recommended to review and reference existing implementations to avoid omissions.
The following explanation is organized to prioritizes clarity and understanding — it may not reflect the most optimal implementation flow. Please read through the entire section before deciding where to begin.
1. Redundancy Transformation
When an object is first uploaded, it exists as a complete file in a single storage space, with a redundancy strategy of None. The transformation of its redundancy strategy is handled by the ChangeRedundancy task in the JCS client, which is triggered daily at midnight.
The transformation generally involves two steps:
- Strategy Selection: The system selects a redundancy strategy for the object based on predefined rules (e.g., object size). Note that transformation is not limited to non-redundant objects — an object can switch between different redundancy modes if needed.
- Execution: Based on the chosen strategy and the current one, a transformation plan is generated and executed.If you need to customize the execution plan or instructions, refer to the later section on Custom Instructions.
See the implementation in the change_redundancy.go and redundancy_recover.go files under gitlink.org.cn/cloudream/jcs-pub/client/internal/ticktock.
2. Redundancy Shrinking
Redundancy shrinking uses a simulated annealing algorithm to optimize redundancy from three dimensions: resilience, redundancy level, and access efficiency.
Currently, it supports redundancy shrinking for replication and erasure coding strategies.
This feature is optional. If needed, refer to the redundancy_shrink.go file in gitlink.org.cn/cloudream/jcs-pub/client/internal/ticktock.
3. Object Download
Any functionality that involves downloading objects (not just HTTP-based downloads) must be adapted to support the new redundancy strategies. The download process includes:
- Strategy Selection
- Strategy Execution
The code for strategy selection is mainly located in gitlink.org.cn/cloudream/jcs-pub/client/internal/downloader/strategy package.
The code for strategy execution is distributed across multiple parts of the project, including but not limited to gitlink.org.cn/cloudream/jcs-pub/client/internal/downloader package.
We recommend using your IDE's search functionality to ensure full coverage when modifying related logic.
Custom Instructions
Most of the currently implemented instructions can be found in the gitlink.org.cn/cloudream/jcs-pub/common/pkgs/ioswitch2 package and serve as good references during custom instruction development.
1. Writing Instruction Logic
Each instruction must implement the following interface:
type Op interface {
    Execute(ctx *ExecContext, e *Executor) error
    String() string
}
String(): Used for debugging, returns a description of the instruction.Execute(ctx *ExecContext, e *Executor)error: The core execution logic.ctx: Execution context, which includes a cancelable context(Context) and custom values(Values) that can be accessed using functions likeGetValueByTypeandSetValueByTypefrom thegitlink.org.cn/cloudream/jcs-pub/common/pkgs/ioswitch/execpackage.e: The executor, which provides access to a variable table through functions likeBindVar,PutVar, or generic variants such asBindVarandBindArrayfrom thegitlink.org.cn/cloudream/jcs-pub/common/pkgs/ioswitch/execpackage.
If Execute returns a non-nil error, the entire plan is considered failed and all ongoing instructions will be aborted.
Typical implementation steps:
- Read Parameters: Use
BindVaror related functions to read required inputs. TheVarIDsshould be defined when the instruction is created. - Process: Implement your desired logic.
- Output Results: Use
PutVaror similar to write results back to the variable table for use by subsequent instructions.
If you understand how the module works internally, you are free to implement any custom logic as needed.
The data structure used with PutVar/BindVar must implement:
type VarValue interface {
    Clone() VarValue
}
Note: All data transferred between instructions is serialized/deserialized using JSON. Avoid using non-serializable fields in custom structs.
If you want to pass a stream (io.ReadCloser) between instructions, use the built-in StreamValue type instead of defining your own, as streams require special handling.
If an instruction produces a stream, consider using WaitGroup or similar mechanisms to ensure the stream has been fully consumed before Execute returns.
Finally, register your new instruction and data types using UseOp and UseVarValue from the gitlink.org.cn/cloudream/jcs-pub/common/pkgs/ioswitch/exec package.
2. Writing DAG Nodes for Instructions
The ioswitch module expresses execution plans as DAGs (Directed Acyclic Graphs), where each node corresponds to an instruction and edges represent data dependencies.
To define a custom node, implement the following interface:
type Node interface {
    Graph() *Graph
    SetGraph(graph *Graph)
    Env() *NodeEnv
    InputStreams() *StreamInputSlots
    OutputStreams() *StreamOutputSlots
    InputValues() *ValueInputSlots
    OutputValues() *ValueOutputSlots
    GenerateOp() (exec.Op, error)
}
Key concepts:
- Each node has four types of slots: input/output for streams and input/output for values.
- Each input slot accepts data from one node; output slots can fan out to multiple nodes.
Env()specifies the environment where the instruction should run (e.g., Driver, Hub, Any). Most instructions can use Any.
You may embed the NodeBase struct from the gitlink.org.cn/cloudream/jcs-pub/common/pkgs/ioswitch/dag package, which implements all functions except GenerateOp.
3. Using Custom Instructions
The lifecycle of an execution plan includes the following stages: writing FromTo definitions, parsing FromTo into a DAG, optimizing the DAG, generating instructions from the DAG. You can extend any of the first three stages to integrate your custom instructions.
The FromTo model is used to describe the structure of an execution plan:
- The
Fromcomponent defines where the data originates - The
Tocomponent defines where the data is intended to go
The plan parser uses predefined rules to convert the FromTo description into a DAG (Directed Acyclic Graph), which represents data dependencies and logical flow between operations. This DAG will eventually be translated into a sequence of executable instructions.
If necessary, you can define your own custom From and To types, as long as they implement the following interfaces:
type From interface {
    GetStreamIndex() StreamIndex
}

type To interface {
    // The range of the file stream required by this To node.
    // The specific meaning of this value depends on DataIndex:
    // If DataIndex == -1, it refers to the entire file range.
    // If DataIndex >= 0, it refers to a specific shard (chunk) of the file.
    GetRange() math2.Range
    GetStreamIndex() StreamIndex
}
You’ll also need to modify the DAG parsing logic in gitlink.org.cn/cloudream/jcs-pub/common/pkgs/ioswitch2/parser/gen package.
Note: Ensure that your custom DAG nodes implement:
type FromNode interface {
    dag.Node
    GetFrom() ioswitch2.From
    Output() dag.StreamOutputSlot
}

type ToNode interface {
    dag.Node
    GetTo() ioswitch2.To
    Input() dag.StreamInputSlot
}
This ensures compatibility with DAG optimization algorithms that rely on these interfaces.
In the optimization phase, you can add your own steps to match certain patterns and replace or merge nodes to improve efficiency or reduce instruction count.
After implementing your optimizer, integrate it into the Parse function in gitlink.org.cn/cloudream/jcs-pub/common/pkgs/ioswitch2/parser package. Carefully consider the interaction between your logic and other optimization steps.
License
MulanPSL v2
Development Team
- Planning & Architecture: Han Bao
- Design & Implementation: Xihua Gong, Jiancong Song, Zhishi Ren, Kaixin Zhang, Junhui Kan
- Advisors: Yijie Wang
- Technical Contact: Jiancong Song (Email: song-jc@foxmail.com)