mirror of https://github.com/Jittor/Jittor
170 lines
6.6 KiB
Markdown
170 lines
6.6 KiB
Markdown
# 使用Jittor实现Conditional GAN
|
||
|
||
Generative Adversarial Nets(GAN)[1]提出了一种新的方法来训练生成模型。然而,GAN对于要生成的图片缺少控制。Conditional GAN(CGAN)[2]通过添加显式的条件或标签,来控制生成的图像。本教程讲解了CGAN的网络结构、损失函数设计、使用CGAN生成一串数字、从头训练CGAN、以及在mnist手写数字数据集上的训练结果。
|
||
|
||
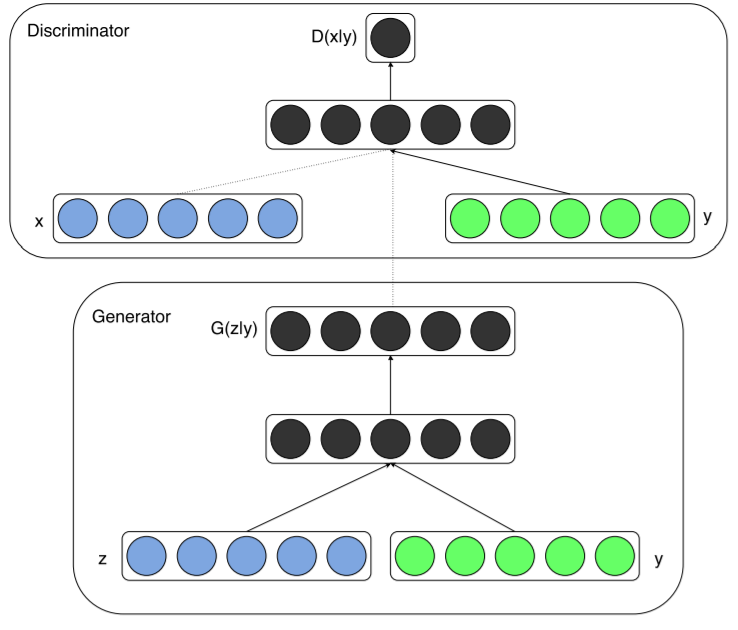
## CGAN网络架构
|
||
|
||
通过在生成器generator和判别器discriminator中添加相同的额外信息y,GAN就可以扩展为一个conditional模型。y可以是任何形式的辅助信息,例如类别标签或者其他形式的数据。我们可以通过将y作为额外输入层,添加到生成器和判别器来完成条件控制。
|
||
|
||
在生成器generator中,除了y之外,还额外输入随机一维噪声z,为结果生成提供更多灵活性。
|
||
|
||
|
||
|
||
## 损失函数
|
||
|
||
### GAN的损失函数
|
||
|
||
在解释CGAN的损失函数之前,首先介绍GAN的损失函数。下面是GAN的损失函数设计。
|
||
|
||

|
||
|
||
对于判别器D,我们要训练最大化这个loss。如果D的输入是来自真实样本的数据x,则D的输出D(x)要尽可能地大,log(D(x))也会尽可能大。如果D的输入是来自G生成的假图片G(z),则D的输出D(G(z))应尽可能地小,从而log(1-D(G(z))会尽可能地大。这样可以达到max D的目的。
|
||
|
||
对于生成器G,我们要训练最小化这个loss。对于G生成的假图片G(z),我们希望尽可能地骗过D,让它觉得我们生成的图片就是真的图片,这样就达到了G“以假乱真”的目的。那么D的输出D(G(z))应尽可能地大,从而log(1-D(G(z))会尽可能地小。这样可以达到min G的目的。
|
||
|
||
D和G以这样的方式联合训练,最终达到G的生成能力越来越强,D的判别能力越来越强的目的。
|
||
|
||
### CGAN的损失函数
|
||
|
||
下面是CGAN的损失函数设计。
|
||
|
||

|
||
|
||
|
||
很明显,CGAN的loss跟GAN的loss的区别就是多了条件限定y。D(x/y)代表在条件y下,x为真的概率。D(G(z/y))表示在条件y下,G生成的图片被D判别为真的概率。
|
||
|
||
## Jittor代码数字生成
|
||
|
||
首先,我们导入需要的包,并且设置好所需的超参数:
|
||
|
||
```python
|
||
import jittor as jt
|
||
from jittor import nn
|
||
import numpy as np
|
||
import pylab as pl
|
||
|
||
%matplotlib inline
|
||
|
||
# 隐空间向量长度
|
||
latent_dim = 100
|
||
# 类别数量
|
||
n_classes = 10
|
||
# 图片大小
|
||
img_size = 32
|
||
# 图片通道数量
|
||
channels = 1
|
||
# 图片张量的形状
|
||
img_shape = (channels, img_size, img_size)
|
||
```
|
||
|
||
第一步,定义生成器G。该生成器输入两个一维向量y和noise,生成一张图片。
|
||
|
||
```python
|
||
class Generator(nn.Module):
|
||
def __init__(self):
|
||
super(Generator, self).__init__()
|
||
self.label_emb = nn.Embedding(n_classes, n_classes)
|
||
|
||
def block(in_feat, out_feat, normalize=True):
|
||
layers = [nn.Linear(in_feat, out_feat)]
|
||
if normalize:
|
||
layers.append(nn.BatchNorm1d(out_feat, 0.8))
|
||
layers.append(nn.LeakyReLU(0.2))
|
||
return layers
|
||
self.model = nn.Sequential(
|
||
*block((latent_dim + n_classes), 128, normalize=False),
|
||
*block(128, 256),
|
||
*block(256, 512),
|
||
*block(512, 1024),
|
||
nn.Linear(1024, int(np.prod(img_shape))),
|
||
nn.Tanh())
|
||
|
||
def execute(self, noise, labels):
|
||
gen_input = jt.contrib.concat((self.label_emb(labels), noise), dim=1)
|
||
img = self.model(gen_input)
|
||
img = img.view((img.shape[0], *img_shape))
|
||
return img
|
||
```
|
||
|
||
第二步,定义判别器D。D输入一张图片和对应的y,输出是真图片的概率。
|
||
|
||
```python
|
||
class Discriminator(nn.Module):
|
||
def __init__(self):
|
||
super(Discriminator, self).__init__()
|
||
self.label_embedding = nn.Embedding(n_classes, n_classes)
|
||
self.model = nn.Sequential(
|
||
nn.Linear((n_classes + int(np.prod(img_shape))), 512),
|
||
nn.LeakyReLU(0.2),
|
||
nn.Linear(512, 512),
|
||
nn.Dropout(0.4),
|
||
nn.LeakyReLU(0.2),
|
||
nn.Linear(512, 512),
|
||
nn.Dropout(0.4),
|
||
nn.LeakyReLU(0.2),
|
||
nn.Linear(512, 1))
|
||
|
||
def execute(self, img, labels):
|
||
d_in = jt.contrib.concat((img.view((img.shape[0], (- 1))), self.label_embedding(labels)), dim=1)
|
||
validity = self.model(d_in)
|
||
return validity
|
||
```
|
||
|
||
第三步,使用CGAN生成一串数字。
|
||
|
||
代码如下。您可以使用您训练好的模型来生成图片,也可以使用我们提供的预训练参数: 模型预训练参数下载:<https://cloud.tsinghua.edu.cn/d/fbe30ae0967942f6991c/>。
|
||
|
||
```python
|
||
# 下载提供的预训练参数
|
||
!wget https://cg.cs.tsinghua.edu.cn/jittor/assets/build/generator_last.pkl
|
||
!wget https://cg.cs.tsinghua.edu.cn/jittor/assets/build/discriminator_last.pkl
|
||
```
|
||
|
||
生成自定义的数字:
|
||
|
||
```python
|
||
# 定义模型
|
||
generator = Generator()
|
||
discriminator = Discriminator()
|
||
generator.eval()
|
||
discriminator.eval()
|
||
|
||
# 加载参数
|
||
generator.load('./generator_last.pkl')
|
||
discriminator.load('./discriminator_last.pkl')
|
||
|
||
# 定义一串数字
|
||
number = "201962517"
|
||
n_row = len(number)
|
||
z = jt.array(np.random.normal(0, 1, (n_row, latent_dim))).float32().stop_grad()
|
||
labels = jt.array(np.array([int(number[num]) for num in range(n_row)])).float32().stop_grad()
|
||
gen_imgs = generator(z,labels)
|
||
|
||
pl.imshow(gen_imgs.data.transpose((1,2,0,3))[0].reshape((gen_imgs.shape[2], -1)))
|
||
```
|
||
|
||
## 从头训练Condition GAN
|
||
|
||
从头训练 Condition GAN 的完整代码在<https://github.com/Jittor/gan-jittor/blob/master/models/cgan/cgan.py>, 让我们把他下载下来看看!
|
||
|
||
```python
|
||
!wget https://raw.githubusercontent.com/Jittor/gan-jittor/master/models/cgan/cgan.py
|
||
!python3.7 ./cgan.py --help
|
||
|
||
# 选择合适的batch size,运行试试
|
||
# 运行命令: !python3.7 ./cgan.py --batch_size 64
|
||
```
|
||
|
||
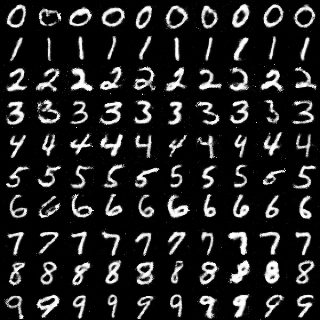
## MNIST数据集训练结果
|
||
|
||
下面展示了Jittor版CGAN在MNIST数据集的训练结果。下面分别是训练0 epoch和90 epoches的结果。
|
||
|
||

|
||
|
||
|
||
|
||
## 参考文献
|
||
|
||
1. Goodfellow, Ian, et al. “Generative adversarial nets.” Advances in neural information processing systems. 2014.
|
||
|
||
2. Mirza, Mehdi, and Simon Osindero. “Conditional generative adversarial nets.” arXiv preprint arXiv:1411.1784 (2014). |